Course Filtering Tool
Data Science & Computing Courses Have Never Been More Flexible
Passionate about moving computing and data sciences into the future — the Center for Computing & Data Science, as an interdisciplinary unit, offers undergraduate and graduate degrees comprising courses with connective potential for many areas and specialties from across Boston University.
The Course Feed Override plugin (in combination with the BU Course Feed plugin) for the CDS theme allows for relevant courses, sourced from Boston University's Academic Bulletin, to be imported and made into posts for shortcode and filtering purposes, maximizing flexibility of use.
The focus of this Override plugin surrounds:
- Course Feed plugin settings: What to maintain and what to ignore.
- An understanding and modification of the traditional Course Feed Shortcode.
- Establishing a Course Feed preset for a BU Filtering page template, listing only the relevant and aforementioned Courses. Doing this will allow visitors to be able to filter through Courses to find one that suits the degree they're planning to or have applied for.
Everything is managed by the WordPress administrator of the CDS theme, with the exception of initialization. Initialization should be provided as soon as it's been made available. If it hasn't, please put in a ServiceNow ticket with BU IS&T requesting Interactive Design to initialize the BU Course Feeds & Course Feed Override plugins.
BU Course Feed Settings
The BU Course Feed plugin is available for activation within the Plugins section of the CDS theme. It allows BU Bulletin course(s) to render with the help of a shortcode structure and relevant course id codes. It's settings need to be considered often for accurate course information to be reflected. We'll look at how and what needs to be considered:
2. In the sidebar to the left, hover over "Settings", and click on "BU Course Feeds".

3. In the text input field of the "Period" option, type the relevant code for the semester, or range of semesters. In this example, we've typed "2023SPRG". An explanation for how to input valid semesters or semester range codes is provided.
Important: To stay relevant and current, this text field needs to be updated every semester.

4. Ensure that the checkbox for the "Show Hub Areas/Toolkits in Results" option is checked. Doing this ensures that BU Hub Areas will render within relevant BU Courses that contain them.

NOTE: The Hub Areas Toolkit checkbox should be checked by default. If it isn't, please ensure it is checked.
5. Once considered, click "Save Changes" to finalize and update.
It's recommended to only adjust the "Period" option for these settings and ensure that the "Show HUB Areas/Toolkits In Results" is checked.

NOTE: In the unlikely event course metadata and information is rendering inaccurate or incomplete: clicking the Flush Course Feed Cache button beneath Save Changes can reboot and refresh content within all courses to whatever is the most recent, accurate edition from BU's Bulletin.
Importing A Course
2. Click on "Course Overrides" within the sidebar to the left. This links to a WordPress interface for managing all Course Override posts. If you choose to hover over "Course Overrides", and click "Add Course Override" instead: you can skip to Step 4 below.

3. Click on the "Add Course Override" button from the Course Overrides post manager.

4. This next step requires knowing a courses code, in which case, referencing BU Bulletin or an internal source will be most helpful. Once you've found a course, type in its course code ID (without spaces) in the Post Title near the top of the page. In this example, we're using "CDSDS100".

Important: It's worth noting that the Post Title text field only accepts valid course codes without any spaces. Anything other than a valid course code will render an alert upon attempting to Publish or Update a Course Override post (see screenshot below).

5. When complete, click on the "Publish" button to the right-hand side of the interface.

6. After publishing or refreshing a Course Override post, a Preview section will render with metadata content for the relevant course. In this case, "CDSDS100" is a course titled "Data Speak Louder Than Words". This preview allows for content verification.

7. With course content verified, click checkboxes with relevant terms from each listed taxonomy that reflect the qualifications of the course within the "Course Filter Detail". Doing the aforementioned enhances the organization of this imported course and enhances the experience of it being a filterable listing.
The Filtering Detail options within this section are derived from the BU Programs plugin. Start by clicking relevant and accurate boxes under the "Education Level" option that correspond to the course. In this example, we're selecting "Undergraduate".

8. If all course metadata information is accurate in the Preview, and all relevant and accurate "Course Filter Detail" options have been made and verified, click the "Update" button to refresh and finalize your newly imported Course Override post.

Course Feed Filtering Tool
The beauty of Course Override posts imported from BU Bulletin is that they are a first of their kind in being Filter-able!
Follow along these steps to set up a filtering page dedicated to them.
2. Hover over the "Pages" link within the sidebar to the left, then click on "Add New".

3. Enter an appropriate title for your Filter-able Course Listing that's in accordance with site Content Strategy and University Brand Voice standards. In the case of this example, we're using "Course Explorer" to demonstrate.

4. Select the "BU Filtering" option under the "Page Template" section.

5. Click on "Publish" to refresh the page. Doing so provides BU Filtering options.

6. Under the BU Filtering section, Select the "Course Overrides" option from the Post Type drop-down.

7. Click the "Select / Deselect All" button from the Taxonomies drop-down. Doing this will activate taxonomies imported from the Degrees & Programs plugin (of this CDS theme) and will have been included with each added Course Override post (if done properly) that ends up filtered.

8. Within the Template sub-section drop-down, choose the "Default" option nested under the grayed-out "Course Overrides". Doing this will tell BU Filtering to only collect and display Course Override posts.

9. Avoid activating the "Show Layout Toggle" & "Show Search Bar" options, as they are disabled for this instance of filtering.

10. In the final section, “Taxonomy Display Options”: select the appropriate format of option selection for each taxonomy from the drop-downs.
The formatting can be either Checkboxes, Radio options, or Drop-downs. Be mindful of what format is appropriate for each taxonomy. Checkboxes allow for the most extensive control: being able to select multiple options. Radio options and the Drop-downs are limited to a single option.
![For every sub-section within the "Taxonomy Display Options" ["Degree Options" through "Locations"], choose "Checkbox" — as it is recommended as the most flexible, advised format.](https://images.tango.us/workflows/f9f1aea9-84ca-4c3e-b318-38ae35bac2e4/steps/19f39f17-9f72-4342-828c-f6b33f1f6a08/e131edb7-8d1d-4ad3-8e9a-0a4c71a612da.png?fm=png&crop=focalpoint&fit=crop&fp-x=0.3439&fp-y=0.4096&fp-z=2.1995&w=1200&blend-align=bottom&blend-mode=normal&blend-x=800&blend64=aHR0cHM6Ly9pbWFnZXMudGFuZ28udXMvc3RhdGljL21hZGUtd2l0aC10YW5nby13YXRlcm1hcmsucG5n)
11. If the page is set in a desired place within the overall site map and any relevant content such as a banner image has been included, click the "Update" button.

12. On page refresh, click on "View page" to observe your newly created and filterable Course Listing.

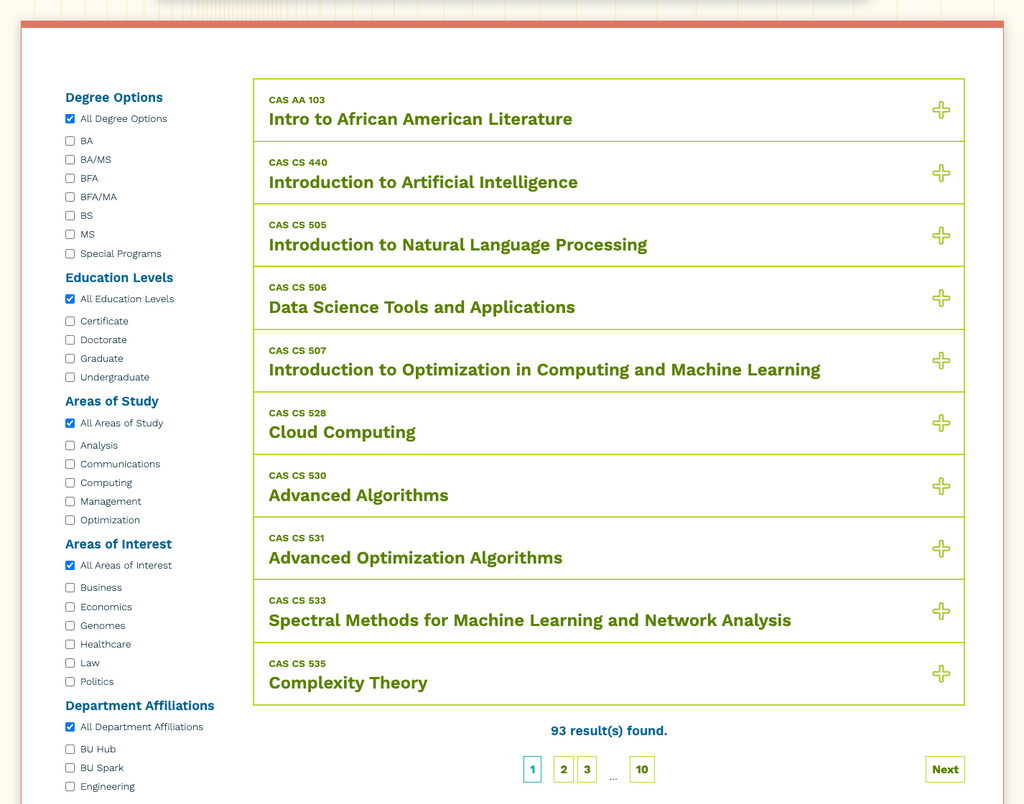
13. Within the newly-created Course Override Filtering page, course listings are displayed top-down to the right side, while filterable options set forth in the admin are displayed to the left side. Clicking a Course Override post will expand to reveal the courses relevant metadata.

Course Feed Override Shortcode
1. With a designated page created, input a shortcode like below — except: inputting the desired course ID code within include="". This will display a Course Override post in a manner consistent with the Course Override Filtering page output. In this example, we're using "cascs440".
Including parts in this shortcode like use_bulletin="Y" format="cfo" serves to render it like a Course Override post.

2. The Course Feed Override shortcode also works when wrapped within a collapsible shortcode, like demonstrated below.

3. After clicking the "Publish" / "Update" button, and the page has refreshed: click on "View Page" to see the resulting Course Override Post in shortcode format.

4. Clicking on the shortcode-ed Course Override post will show it's relevant metadata.

