Calendar
Activating Features
Follow the three steps below to set up new features in your Research Companion theme calendar template, including adding excerpts and thumbnail images to the calendar listing template, and adding a banner photo to the individual event template. Required steps include adding three custom fields to your calendar and submitting a ServiceNow request to IS&T.
Step 1: Add Custom Calendar Fields
Add the three custom fields described below to your calendar using these step-by-step instructions in TechWeb. ONLY administrators can add custom fields — which can then be utilized by both administrators and contributors.
The following custom fields should be created:
| Name | Label | Data Type |
excerpt |
Excerpt | Generic Data |
thumbnail_id |
Thumbnail ID | Generic Data |
banner_id |
Banner ID | Generic Data |
Notes:
- The Name and Label must be entered exactly as written above.
- The excerpt field isn’t required for the event thumbnails and banners fields to be utilized.
- Due to technical caching issues with the University’s Calendar app software, it may take anywhere from to 15 – 30 minutes for the Excerpt, Thumbnail ID, or Banner ID fields to appear in your calendar.
Step 2: Submit a ServiceNow Request
After adding the custom fields (as detailed in the Custom Calendar Fields section above), copy and paste the text below (between the lines) into an email addressed to help@bu.edu and customize the fields for your site’s calendar.
Dear Help Desk,
Please route this request to the bu.edu & Mobile team to perform the following tasks on the calendar for my site.
Site URL:
[ your research site's URL ]
- Turn on calendar excerpt in Settings -> Reading.
- Regenerate Media.
Thank you.
Notes on Customizations:
-
- If you only want to enable event excerpts (not the custom thumbnail and banner images), you only need to submit your ServiceNow ticket (above) with the request to “Turn on calendar excerpt in Settings -> Reading.”
- Likewise, if you only want to enable the custom thumbnail and banner images (not the event excerpts), you only need to submit your ServiceNow ticket with the request to “Regenerate Media.”
- If your calendar uses recurring events: In rare instances, your calendar may make use of a recurring event template, which allows your calendar to display recurring events. New fields will not be visible on a recurring event template until that event is converted to a regular event template with a ServiceNow request. Any events that require this adjustment should be outlined and included in the ServiceNow Ticket script.
Using Features
Featured Event
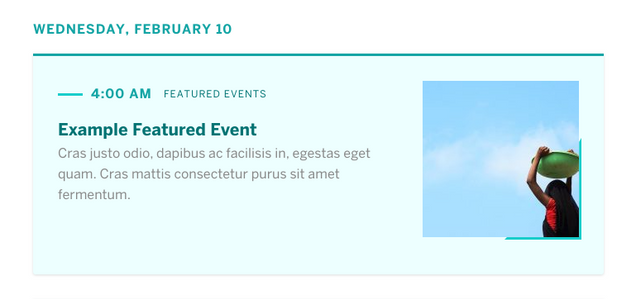
Provide extra visual emphasis to special events with the Featured Events topic/category. It can be added and included to events in your sites BU Calendar App.
- Access your sites respective BU Calendar app by navigating to the Calendar tab in the WordPress Admin and clicking the blue, underlined “BU Calendar” link.
- In the BU Calendar for your site, navigate to — and click on — the TOPICS tab.
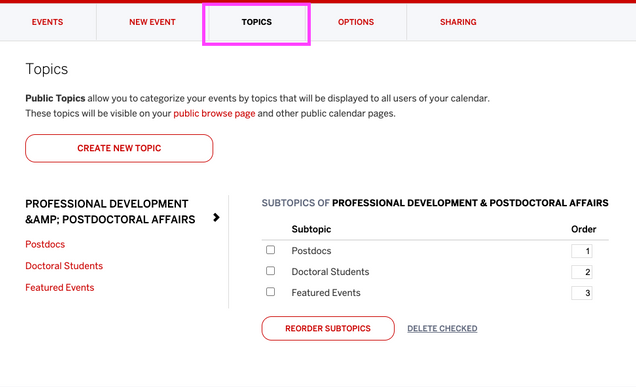
An active TOPICS tab(outlined in magenta) in the BU Calendar. - Select the CREATE NEW TOPIC button.
- In the Name field on the following page, enter the exact text as shown here: Featured Events
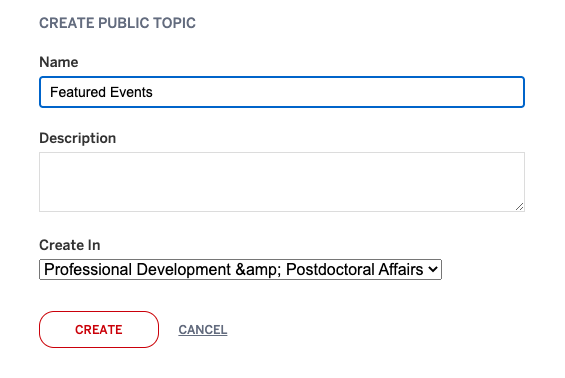
(Research Companion Theme site Professional Development & Postdoctoral Affairs is used as an example. Your site calendar/site name may vary.) - Leaving the Description field blank, click the CREATE button toward the bottom.
Marking an Event a Featured Event
- Once the above steps are complete, navigate to the EVENTS tab (upon finding and clicking on an existing event — selecting Edit Event) or the NEW EVENT tab (to create an event).
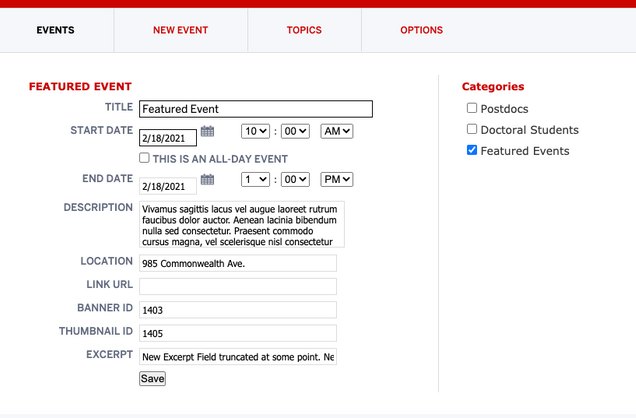
An example event with the Featured Events Category active. - From the Edit Event options, ensure the newly created Featured Events Category is selected.
- Click Save.
Event Descriptions & Excerpts
Please note: This feature is available after its custom field has been added and has been turned on via a ServiceNow request in the Activating Features section(top of this page). Also, It can be a slight challenge to input content within the fixed space the newly created custom field provides. We recommend editing your content in another application and (once ready and approved) importing via copy and paste.

For brevity, Excerpt‘s are limited to a max of 220 characters (or roughly about 30 words, including html tags, at which the description is truncated) on Calendar Event Listing pages.
If an Excerpt field is added to the calendar, it will display first. If an Excerpt‘s field is empty, the Description field will be used in its place.
- Create, or edit, an event in your sites respective BU Calendar App by navigating to the Calendar tab in the WordPress Admin and clicking the blue, underlined “BU Calendar” link.
- Edit the Description and/or Excerpt as required.
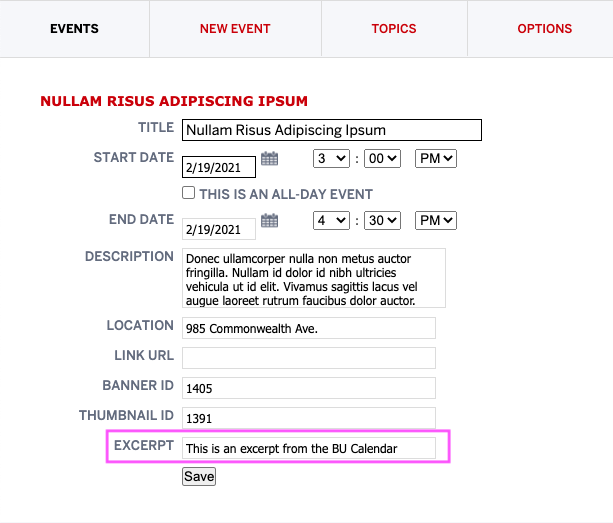
The Excerpt field is highlighted in an example event within the BU Calendar app. - Click Save.
Event Thumbnail & Banner Imagery
Please note: This feature is available after its custom field has been added and has been turned on via a ServiceNow request in the Activating Features section(top of this page). Also, It can be a slight challenge to input content within the fixed space the newly created custom field provides. We recommend editing your content in another application and (once ready and approved) importing via copy and paste.
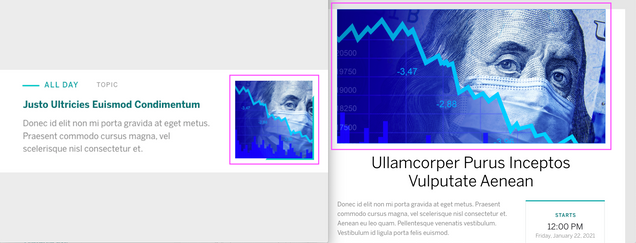
The custom Thumbnail ID and Banner ID fields created in the BU Calendar app can be used to designate two types of imagery for an event using WordPress’ Media Library. One is a thumbnail image, to tease an event. The other is a banner image(which can appear on an event’s info page).
Tip: Remember to use discretion in selecting imagery for your event. Avoid posed stock photography of people presenting or of topics that are irrelevant to the event subject and/or text.
Use photography where the focus[subject] is in the center (or as close to the center) of the imagery as possible in order to avoid being cropped out(especially on a Full Browser Window Width layout).
Adding/Editing Imagery
Be Advised: (As provided by Interactive Design for the Research Companion theme) Event Banners should be sized to an aspect ratio of 16:9, with a minimum of 792 x 396 pixels and a maximum of 1584 x 792pixels. Event Thumbnails should be sized to a square aspect ratio of 1:1, with dimensions at least 189 x 189 pixels but no greater than 500 x 500. Be mindful of keeping image file sizes low for speedy downloads and data-sensitive mobile users.
- In WordPress, navigate to the Media Library and select either an available image, or an uploaded image.
- Examine and confirm the images information and sizing. Refer to this sections advisement above on file dimensions and aspect ratios.
- In the URL of the browser window, there will be an image
ID(always a multi-digit number) at the end of the URL. Copy that ID number.
In the case of the example below, the number (outlined in magenta) is1171.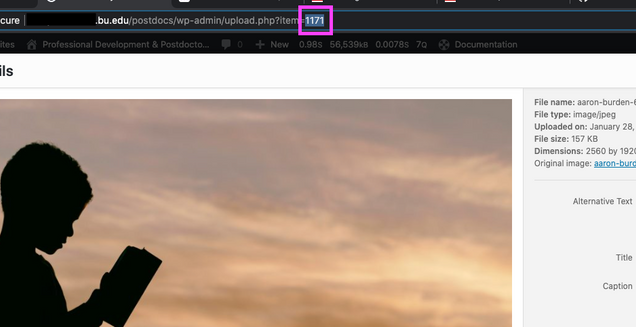
In this example, the Image ID number (outlined in Magenta, in this example, 1171) for the desired Event image can be found at the tail end of the browser’s URL when an image is selected in the media library. - Create, or edit, an event in your sites respective BU Calendar app by navigating to the Calendar tab in the WordPress Admin and clicking the blue, underlined “BU Calendar” link.
- Depending on whether the copied image ID is intended to be used as a banner or thumbnail — paste the image ID into the appropriate BANNER ID or THUMBNAIL ID field.
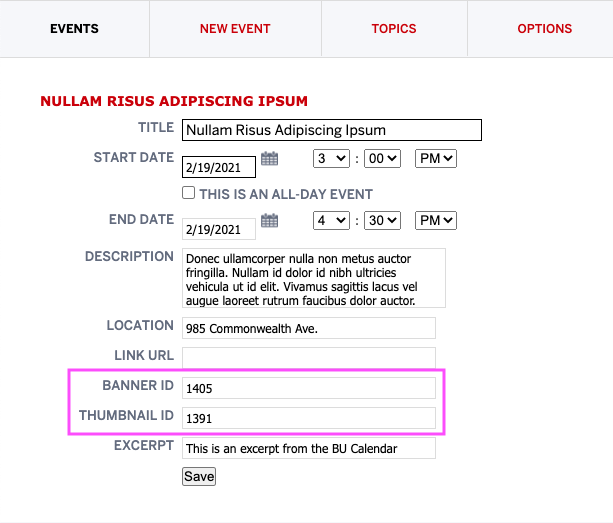
An example of the Banner ID & Thumbnail ID fields with each image ID fields filled. Your image ID numbers may differ. Neither is required for the other to work. - Click Save.
Be Advised: A Banner ID only appears on the Calendar’s Individual Event page(The comprehensive page with only information about a single event). A Thumbnail ID only appears on the Calendar Listing page.
Bear in mind that neither Banner ID or Thumbnail ID will substitute for the other. If a Banner ID has been fulfilled with an image, but a Thumbnail ID has not been included, only the Banner will appear on the Individual Event page,
This site does not have any calendar associated with it.